Showing posts with label Crafts. Show all posts

Friday, May 4, 2012

I’m back………

Hi, I'm sorry that I haven’t posted since March.  My health took a turn for the worse with all of our rainy weather. I just couldn’t bring myself to write or do any projects because I was so stiff & in pain.  Some days I couldn’t even move.  lol..  darn that Fibromyalgia.

Now, anybody that knows me knows that I have to be pretty sick to not have any projects in the works.

I received an IPAD for my birthday in March. I have had such a fun time with it!! The apps are endless. I have learned sign language, astronomy, how to draw and much more.  I honestly got it, hoping to do my blogging on it.  But…for me, the keyboard is just too inconvenient (too small) for blogging.  So, for now, I will stick with my trusty desk-top computer.
Here is a picture of my new IPAD:
DSCN8487
Ain’t she pretty?  lol….. There are so many reasons that I love it, but for the most part I love it because it is fast and I enjoy using it more than my old, slow, dinosaur-like” computer. lol.

I was only able to complete two projects recently…the first one is kind of weird so bear with me…….There is an old Army base not too far from us.  It was used for the Calvary, WWII, Korean and  the Vietnam Wars.  When they closed the base  in the 90’s, the miles and miles of barracks/housing lay untouched.  Then the government tried to clean the base up to convert it into residential homes.  Removing the asbestos and leaded paint used on all the structures proved far more expensive to do than previously thought, so everything was abandoned.  And that is how it lies today.  Power poles lay on their sides,  door are removed, the housing units/barracks remain almost untouched…a lot of furniture still remains in the homes.  As we were driving through, we noticed an old piece of wood in the street.  My husband stopped the car to  pick it up for me and said very sweetly “you can turn this into something, can’t you?”  How cute.  With his help, I added hooks and turned it into a jewelry holder for my room. The stories it would tell if it could…..lol  I hope it doesn’t have too much asbestos or leaded paint on it.  The jewelry doesn’t touch it, I make sure of that.
Here is a picture:
DSCN8483 
I know that it doesn’t look like much, but I love its extreme “shabbiness”.  lol.

The other project that I finished this week was the painting of a birdhouse for my bedroom.  Yes, I changed my accent color in my bedroom again….The nice thing about having a “neutral” color in my bedroom is that I can change the accent color and have fun doing it! This “month” I added fuscia pink and bright green to the bedroom for a “splash of Spring” .  I  painted another birdhouse as well for the other round table, added flowers, a candle holder and made a couple of pillows. Voila! Please excuse the clock radio and sound machine-they are my hubbies “must-haves” but they aren’t cute. lol
just birdhouse
DSCN8718left side of bed vignettepillows
So, it brightened up the room a little.   I hope that you have a fabulous weekend.  The weather should be warming up here quite drastically this weekend and from here on out I hope it remains warm…My body and I hope that the “rainy season” is over for now. Fibromyalgia and rain are a ugly combination.  I looked like a 102 year old woman getting out of bed in the morning! lol
TGIF.  Make it a great one!
Fondly,

Friday, March 16, 2012

Clothespin Picture Frame

Thank Goodness it's Friday! .  I was able to get a few things done this week, but not too many.  Yes, they have all involved spray paint (Rustoleum's Heirloom White).  lol....My daughter has been ill and between my son, husband and I checking on her every hour, we are behind on our sleep for sure.  She had a severe reaction to two meds and was sick&delirious.  It was really scary!!  She had us all very worried.  She is feeling a little better now.  To cheer her up we got out some old movie tapes that we have not seen for many,many years..  My daughter, husband and I laughed so hard we were crying- the tapes were THAT funny.  My husband used to video tape our kids on their first and last days of school.  This creates many different opportunities for some funny stuff- especially since our kids were never "morning people". lol...  Anyway....the pictures below show a couple of projects. The first being a picture frame.  I had this old "gold" frame laying in a closet. I spray painted it,  hot-glued string to the back, added a bow in the front and started hanging pictures on it. I hung it in our bedroom.  The other picture shows a new paint color on the frame of a picture in our kitchen.  This picture has been in our garage for a long time. The frame was black.  The color? Rustoleum's Heirloom white of course.  lol!!  Have a wonderful weekend!!


Debbie

Monday, March 12, 2012

Newly Painted Chalkboard Frame

DSCN8277final
I have had an old, gold-framed mirror just sitting out in my garage for a long time now.  It was a gift from my parents when my husband and I got married over 30 years ago.  It was time for a make-over!! Out came the Rustoleum Spray Paint (Heirloom White).  I use Rustoleum because it gives the best coverage and dries very quickly!.  I gave it about 5 light coats of paint (with help of course, since I have two "frozen shoulders" lol)  Then the mirror was next!  I sprayed the mirror with about 5 coats of Rustoleum’s  black Chalkboard Paint.  Getting the mirror back into the frame was not easy (thanks for your help Kevin!). I coated the inside of the frame with, what I thought was, heavy-duty glue that would hold it in place.  I was wrong!!  The mirror fell out.   My husband to the rescue!!  He made a trip to OSH to get “Gorilla Tape”. He said "duct-tape works every time." I was a bit skeptical.  Hubby taped up the mirror and let it set for several hours.  It worked. I wrote “bliss”  on it with the chalk. Fun!!  Below is a picture of the frame hanging over our couch.
DSCN8285
Here is a close-up of the frame.final sign
We had to move our clock above the sofa to put our new frame there, so we moved the clock over the fireplace.  DSCN8283
Then we had to move the frame that was over the fireplace to the other wall!!DSCN8290final
Props to my husband!!!!  Thank you honey!!  And he thought that he was "just" hanging the frame over the couch…..lol……He is awesome and I am lucky that he is so patient with me!! Debbiehttp://www.blogger.com/post-edit.g?blogID=742455358083715372&postID=8887449425243734275

Wednesday, March 7, 2012

Easter Banner

DSCN8061
Today I made an Easter banner with some left-over scrapbook paper.  After I made the “ribbons” (because they look like medals/ribbons) I laid the lettered circle on top, but it looked too flat  sooooo……. I cut out some thin strips of paper and folded them accordian style, then I "fanned" them out and glued the ends together.(forming  a circle).  Then I glued the lettered circle to the top of the accordian circle.  It gave it just a little “lift”.  I definitely think it improved the over-all appearance.   See the picture below to get a better view of the accordian circles.
DSCN8050
The next picture shows a little “visitor” that I had today.  He was hiding in my flower pot.  hehe. 
DSCN8048
This picture shows a wooden easter sign.
DSCN8055
Have a wonderful day!!

Debbie


Sunday, March 4, 2012

Picnic Basket Make-over

planter 2
I love make-overs and this is the best one that I have seen lately.  I was checking out the blog” Confessions Of A Plate Addict” and saw this and just knew that I had to share it.  Above is shown a “before” shot…just a plain wicker picnic basket. 
shabby  basket planter_thumb[9]
This is the after picture.  Isn’t it amazing?  I sure think so and I will be taking a quick run to my local Goodwill in the next few days to see if I’m lucky enough to snag one of these to do this project. Please check out the blog "Confessions of a Plate Addict" to see more pics. Just click on the link below and you can see the details. 
http://confessionsofaplateaddict.blogspot.com

Saturday, March 3, 2012

Burlap- ruffled lamps

DSCN7977
Hi.  This is attempt #2 at making a ruffle for my lamps using my burlap ribbon (see my post a few days ago at attempt #1).  I gathered them and hot glued them to the shade.  Warning…..since burlap ribbon is weaved and full of holes, be careful when you are hot-gluing the ribbon to the lamp.  I burned my fingers, even though I was as careful as I could be. 
First, I used  a tape measure to  measure the width the lamp shade.
Then I  doubled  that number.
I cut out my burlap ribbon to that length.
I also cut a piece of embroidery floss a few inches longer than the ribbon (you will use this to pull on when you are done sewing) and it  will gather the material. 
  To ruffle the burlap ribbon, I layed a row of embroidery floss down the middle of the ribbon.  Then I used a zig-zag stitch directly over the string of floss.  I sewed directly on top of the floss down the entire length of the ribbon. 
When I finished, I grabbed the embroidery floss and pulled it.  You will see how it gathers.  It is amazing!  SO easy. 
Then I hot-glued the ribbon to the shade and I was done. 
I sincerely apologize for the terrible quality of the pictures.  I took them this evening and the lighting was very poor.  I needed two shades-one for the lamps on either side of the couch.  The pictures just show the lamp to the right side of the sofa, there is one on the left also.
Note: I got the burlap ribbon at an antique store, but you can find rolls of it at Michaels. 
There are a few more pictures below.... 


signature

Friday, February 24, 2012

Mercury Glass Craft

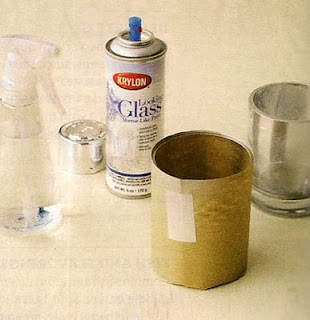
I saw this idea in Martha Stewart Living to make your own Mercury Glass and really want to try it. Besides looking really simple to do, I love that I can upcycle my old clear vases into a little arrangement that looks nice, like this:
All you need is a couple of clear vases or votives, a spray bottle with water and mirror paint. You can get the mirror paint from Krylon.
Clean your vase or votive then cover the exteriors with paper. Spray the interiors lightly with water and then with mirror paint. Turn upside down to dry overnight and then repeat if too sheer. When finished, if you want to use it for flowers, just make sure to put them in a glass and then place glass in vase. Done! This would be a really inexpensive way to dress up a table for a party or a mantle for the Holidays!
I love this idea! I definitely have a thing for mercury glass

Wednesday, February 22, 2012

Burlap Ruffles

This roll of burlap was purchased at a local antique shop in the Sacramento area- The Antique Trove.  I had been "eyeing" it for awhile and talked myself out of it because it was such a "HUGE" roll and I thought that I would end up giving it to my grandkids someday because it was THAT big.  Anyway, I finally "caved in" and bought it. 

 I decided to make some ruffles for my lamps.  I like the way it turned out.
This is a photo of the lamps together in the living room.


Friday, February 3, 2012


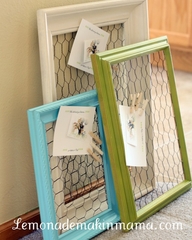
Today I am in a crafty mood.  Not that I will actually do any of these projects today, but I am storing them "in the idea" file for the near future.  I have made bulletin boards before, but I love the idea of drawer pulls for holding earrings.  I have never considered spray painting light bulbs through lace.  I can just see the eyeballs rolling when my family sees the spray paint cans coming out.  I have a reputation of loving to spray paint.  Lastly, the chicken wire on pastel-painted frames is such a great idea.  I have seen chicken wire used to make jewelry holders, but the clothespins make it a cute bulletin board.  I hope you are inspired to craft today. I like these crafts because I have a lot of the materials around the house (okay...maybe not chicken wire! lol).  TGIF!

Wednesday, February 1, 2012

The birdhouse pictured above was purchased at TJMaxx.  It was in the clearance section and was badly in need of some TLC.  It had some gouges that I repaired with wood putty.  THe top portion was dinged up, but I painted over it with Rustoleum's Heirloom White spray paint and the blemishes disappeared.  I added the butterfly, bird and Paris sign.  I think this makover went well!!

Friday, January 27, 2012

Stained Glass

TGIF!!  I love Fridays!  The above picture was my first attempt at a stained glass project.  I made it for my grandma for her birthday.  It was tedious and difficult, but I like the end result. :)  I got all of the supplies at Michaels.  I love Michaels and could spend all day there if you let me. :)

Thursday, January 26, 2012

Blankets


Good Afternoon!  I wanted to share these fleece blankets that I made for my nieces and nephews for Christmas.   I also made one for my dad (pictured above with his blanket).  He is a veteren of the Marines, so I loved that I could find fleece with the Marine emblem and the saying "once a Marine, always a Marine".  So true!!   My nephews love sports, so I made them blankets with sports themes.  My neice Courtney(the youngest one pictured) LOVES horses,so she got a horse blanket.  I even made her a fleece pillow to match.  I made a vollyball fleece blanket for my niece Brooke, because she plays on her High School's vollyball team.  My daughter got a blanket with cats on it because she adores cats. My son (who is 26 years old) didn't cooperate for the photo, so he is not shown with his. His was done in Camoflag(sp?) colors.  All in all, I was bent over my sewing machine for weeks it seemed like.  I've been told by my nieces and nephews how much they use the blankets, all the work paid off- Yay!

Saturday, January 14, 2012

Saturday

Hi!  I hope that you are having a wonderful Saturday!  It is beautiful weather today where I live- nice warm temps into the 60's.  Gorgeous.  The nights get very cold (well for us, it's cold)...into the low 20's, high 30's.  I made the item showed above from a round cardboard box that I got at Beverly Fabrics.  The adorable baby on top is my grandfather when he was a baby.  The little flag that he is waving (lol) says 1914.  That is the year that he was born.  I had fun doing this project.

Thursday, January 12, 2012

Thursday

I got this cute picture stand for Christmas at a local store named "Magpie".  I just loved it, but it was gray so I painted it.  I had some cardstock and stickers available so I made the British-inspired post-card for the middle of the stand.  I loved the Queen Elizabeth stamp!

Wednesday, December 14, 2011

Wednesday craft

This is my craft for today.....I made a blanket for a friend's new baby girl.  And, of course, I had to make her a headband (aka brain squeezer.lol) too.  :)

Saturday, December 10, 2011

Ornaments


HI!  Hope you are enjoying your Saturday!  I have been procrastinating sooo much today.  I know that I should be working on my Christmas blankets, and baking....but instead I have been making ornaments and cutting out felt to make felt flowers (the gray one pictured above).  Totally random. lol.....Anyway, the top ornament was made with a just a $4 clearance frame at TJ Maxx and some text that I added on the computer. The next ornament was made with a spindle and wood moulding (Michaels).  I painted it silver and added beads etc.  The next one was made from a little block of wood that I had.  I drilled a hole for the wire hanger (which I twisted around a pencil) and added embellisments.  It was a fun, waste of time on a Saturday morning while my husband was at work.  lol...Have a great day!!

Wednesday, December 7, 2011

Wednesday


Hi.  The tree pictured above was made out of an old paperback dictionary that I had laying around the house.  I folded 150 pages of the book as I watched Michael Buble sing on his Christmas Special last night (I enjoy Michael Buble's singing sooooo much!) All you have to do to make this "paperback book tree" is to get a paperback book with 150 pages (no less, tear out excess pages if there are more than 150). Tear off the cover and back-leaving the spine intact.  Starting at the first page, take hold of the top right of the page and fold it in toward the spine.  Then take that same page again and fold it once more toward the spine.  Fold the remaining bottom piece up so you can have a flat bottom for the tree to stand on.  Do this 150 times and then glue the front and back pages together to form a tree.  For the top of the tree, get a toothpick and insert it in the shank of a button.  Insert into spine at top of book.  Have fun decorating it!! I was out in the freezing cold this morning "spraypainting" mine with a bit of silver.  lol....  

Saturday, November 19, 2011

Dollar Store Craft


Hi.  I was in a Christmas craft mood today and so I looked around at what I had.  From a recent dollar store trip I picked up four of the religious candles.  I added some silver scrapbook paper, ribbon and more ribbon and "voila".  I will be decorating this year with a silver and white theme so they will fit in perfectly.  My hubby took me to Baskin Robbins tonight for a  Peppermint ice cream cone.  It is a flavor they carry just  for the holidays.  Starbuck's Peppermint Hot Chocolate is my other favorite food treat for the holidays.  No wait........pumpkin pie, peppermint bark....fudge...I take that back.  I have a LOT of favorite holiday foods!!